Clean line-work can make even simple manicures look polished. Nail art drawing gel pens are designed for controlled detailing—thin outlines, dot clusters, French tips, and quick accents—without needing multiple brushes. This guide covers what these pens are best at, how to use them for sharper results, and how to keep designs smudge-free and longer-lasting. For more guidance, see Missy’s Nail Art – PBS Utah.
What nail art drawing gel pens are best for
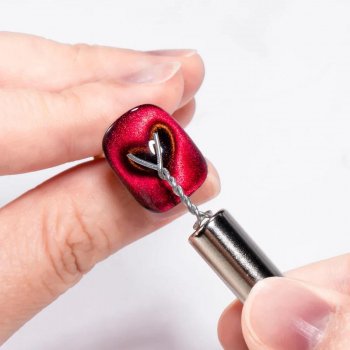
Gel pens shine when a design depends on precision rather than full-coverage painting. The pen-style format makes it easier to place detail exactly where you want it—especially for beginners who find ultra-fine brushes tricky. For further reading, see Why Manicurists Are Modern-Day Michelangelos | Essay, Nexus.
- Fine outlines for florals, hearts, stars, butterflies, and cartoon-style accents
- Short strokes for plaid, herringbone, and check patterns that stay evenly spaced
- Dotting effects (polka dots, gradients, constellation nails) by varying pressure
- Quick French tip detailing and sidewall clean-up lines for a crisp edge
- Layering over solid color to add contrast without bulky texture
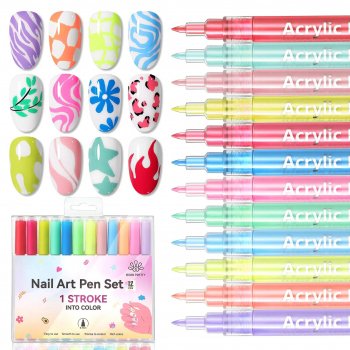
What’s included in the 12pc set
A multi-pen kit keeps the workflow simple: pick a color, draw, cap, and move on—no rinsing brushes between steps. If you want a compact nail art setup for home, practice boards, or travel, a 12-piece set is a practical starting point.
- A 12-piece set of nail art drawing gel pens for creating multiple styles without switching tools constantly
- Designed for detail control: steady grip and a pen-style format that’s comfortable for beginners
- Useful as a compact kit for home manicures, practice boards, and travel setups
- Works well for mixing simple designs (lines/dots) into more complex looks (florals, geometric, abstract)
If you’re ready to build a simple detail kit, see the 12pc Nail Art Drawing Gel Pens (in stock).
Quick design guide using gel pens
| Design style |
How to draw it |
Pro tip to keep it neat |
| Micro French tip |
Draw a thin smile line, then fill the edge with short strokes |
Anchor the pinky finger on the table to steady the hand |
| Polka dots |
Tap the tip lightly for small dots; press slightly longer for larger dots |
Do dots in alternating rows so spacing looks intentional |
| Plaid / grid |
Draw parallel lines one direction, then cross with evenly spaced lines |
Wipe mistakes quickly with a small brush and remover before it sets |
| Floral accents |
Make 4–5 rounded petals with short curved strokes; add a center dot |
Layer petals after the first pass is dry to avoid dragging |
| Abstract squiggles |
Use continuous flowing lines with changing thickness via pressure |
Stop before the nail feels crowded; leave negative space |
How to prep nails for cleaner lines
Detailing looks sharper when the surface is smooth and oil-free. Skipping prep often leads to dragging, skipping, or uneven flow—especially on ridged nails.
- Start on a smooth surface: shape the free edge, lightly buff ridges, and remove dust
- Cleanse the nail plate to reduce oils that cause skipping or uneven ink/gel flow
- Apply a base coat and a fully dried color layer before detailing
- If working over a sticky layer (from gel polish), ensure it’s appropriate for the pen’s formula or wipe if needed for crisp strokes
- Keep a cleanup brush or cotton-tipped applicator nearby to sharpen edges quickly
For extra safety and ingredient-awareness when using nail products, review guidance from the FDA on cosmetics safety and nail allergy considerations from the American Academy of Dermatology.
Techniques for sharper results (especially on the dominant-hand challenge)
Most “wobbly line” problems come from trying to draw too long of a stroke at once. A few small adjustments can dramatically improve control, even when working on your non-dominant hand.
- Use “micro-strokes” instead of one long line: connect short segments to avoid wobble
- Rotate the finger, not the wrist: turn the nail so lines are pulled toward the body for steadier control
- Start with light pressure: build thickness in a second pass instead of pressing hard
- For symmetry (hearts, tips, wings), sketch the center point first, then mirror each side
- Practice on a nail tip or silicone mat to learn how quickly the pen deposits product
Layering, sealing, and wear time
Most smudging happens during layering or top coat application. A little patience between steps keeps edges crisp and helps the final finish look smooth.
Care, storage, and troubleshooting
A simple set of looks to try (5–15 minutes each)
More in-stock picks to round out your setup
FAQ
Do nail art gel pens work on regular nail polish?
Yes, they can work over regular polish as long as the color layer is fully dry. Test on one nail first, give the detail time to set, and seal with top coat to reduce smearing.
How can smudging be prevented when adding a top coat?
Let the details fully dry/set, then apply top coat with a light “float” technique (minimal brush pressure). A thin first layer helps lock the design, and a second leveling layer can be added if needed.
What’s the easiest way to draw clean lines with the non-dominant hand?
Stabilize your hand on a table, rotate the finger instead of bending the wrist, and use short connected strokes rather than one long line. Start with dots and micro-French tips before moving to longer outlines.
Recommended for you


Leave a comment